Patasente Payment Gateway
In this detailed article, we introduce you to Patasente Payment Gateway, and help you learn how to use it so that you can increase online sales.
Introduction
Patasente offers your business with the best digital assistance for growth.
Patasente enables website owners and online businesses to be paid for their goods and services through a range of sources such as MTN Mobile Money, Airtel Money, Patasente Wallet, (Patasente Cards, Visa and MasterCard are coming soon).
By offering the simplest to set up widgets, Patasente enables all types of websites to accept and collect payments.
Intregration
Patasente offers 2 integration options.
The REST API
If you’re a developer, our REST API allows you to tap into the power of the Patasente core. You can use it to collect payments from customers on any website and mobile app.
Our team has also put together an easy to follow guide. Follow the details below to access the developer guide.
- Login to access your patasente account via https://patasente.me
- Go to Collection Widgets
- Developer documentation
WooCommerce Patasente Payment Gateway
This is the best alternative, and is suitable for none-developers, web designers, and managers.
The WooCommerce Patasente Payment Gateway is a robust and easy to integrate. Makes it easy for customers to pay for goods and services online.
Website owners can Accept and collect payments from a wide range of options including Mobile Money (Airtel and MTN), Patasente Wallet, Patasente Cards, Visa and Master cards.
Requirements
- We assume you’re familiar and comfortable with WordPress websites.
- You can install, and activate plugins in a WordPress website.
- You can install, active, navigate and set up WooCommerce plugin fresh and existing WordPress websites.
The Patasente WooCommerce plugin is free, which you can download via https://wordPress.org
Receive payments using WooCommerce Patasente Payment Gateway
-
Get a free Patasente account
First things, first, get a free patasente account.
The free Patasente account gives you a business wallet and a couple of other tools. To get the free patasente account, visit https://patasente.me and sign up right away.
- Login
Login to your account by providing your credentials.
-
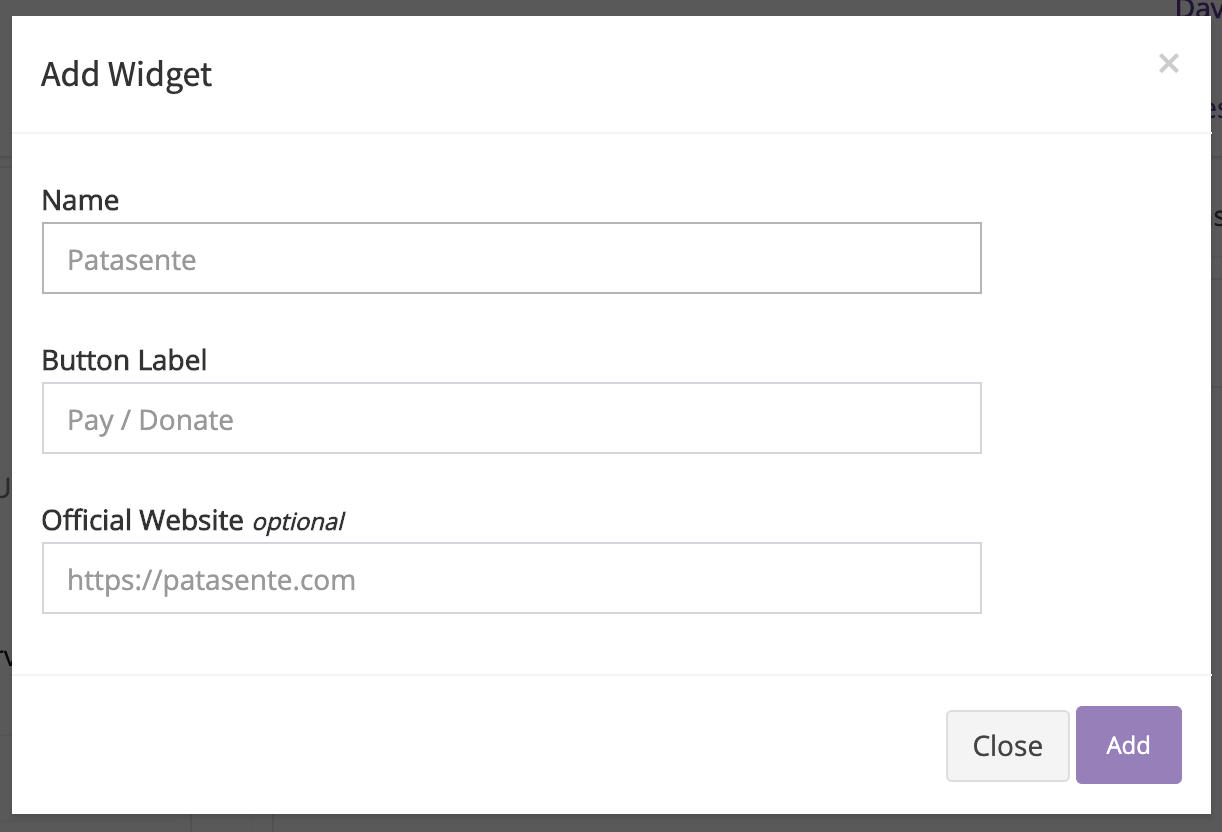
Create a widget
 Fig 1:Create Patasente Widget
- After successful logging in, locate and click the Collection widget link.
- A list(if you have) of your widgets will be displayed.
- Click Add Widget to create a new Widget.
- Provide the Name, Button Label and optionally the official website where you want to integrate the widget. Finish by clicking Add.
- If the widget is created a verification code will be sent to your phone and you will be required to provide it before starting to use the widget.
- Wait for the team at Patasente to review and verify your widget, upon which you will get a Gateway API key and Gateway widget key.
 Fig 2:Verified Patasente Widget
-
Get the Plugin
The WooCommerce Patasente Payment Gateway is available for free at the WordPress Plugin repository and your patasente.me account.
 Fig 3: WooCommerce Patasente Payment Gateway
- Install and setup the plugin
You will have to login to your WordPress and WooCommerce based website. Access the plugins menu and click Add New. Search for Patasente, then select WooCommerce Patasente Payment Gateway, then click Add Plugin.
Alternatively, Click upload then select the plugin file from your computer and click Upload.
- After installing the plugin, activate it.
- Access the settings through WooCommerce -> Settings.
- Alternatively access the settings Plugins -> WooCommerce Patasente Payment Gateway -> Settings.
- Make sure to Enable Patasente Payment,
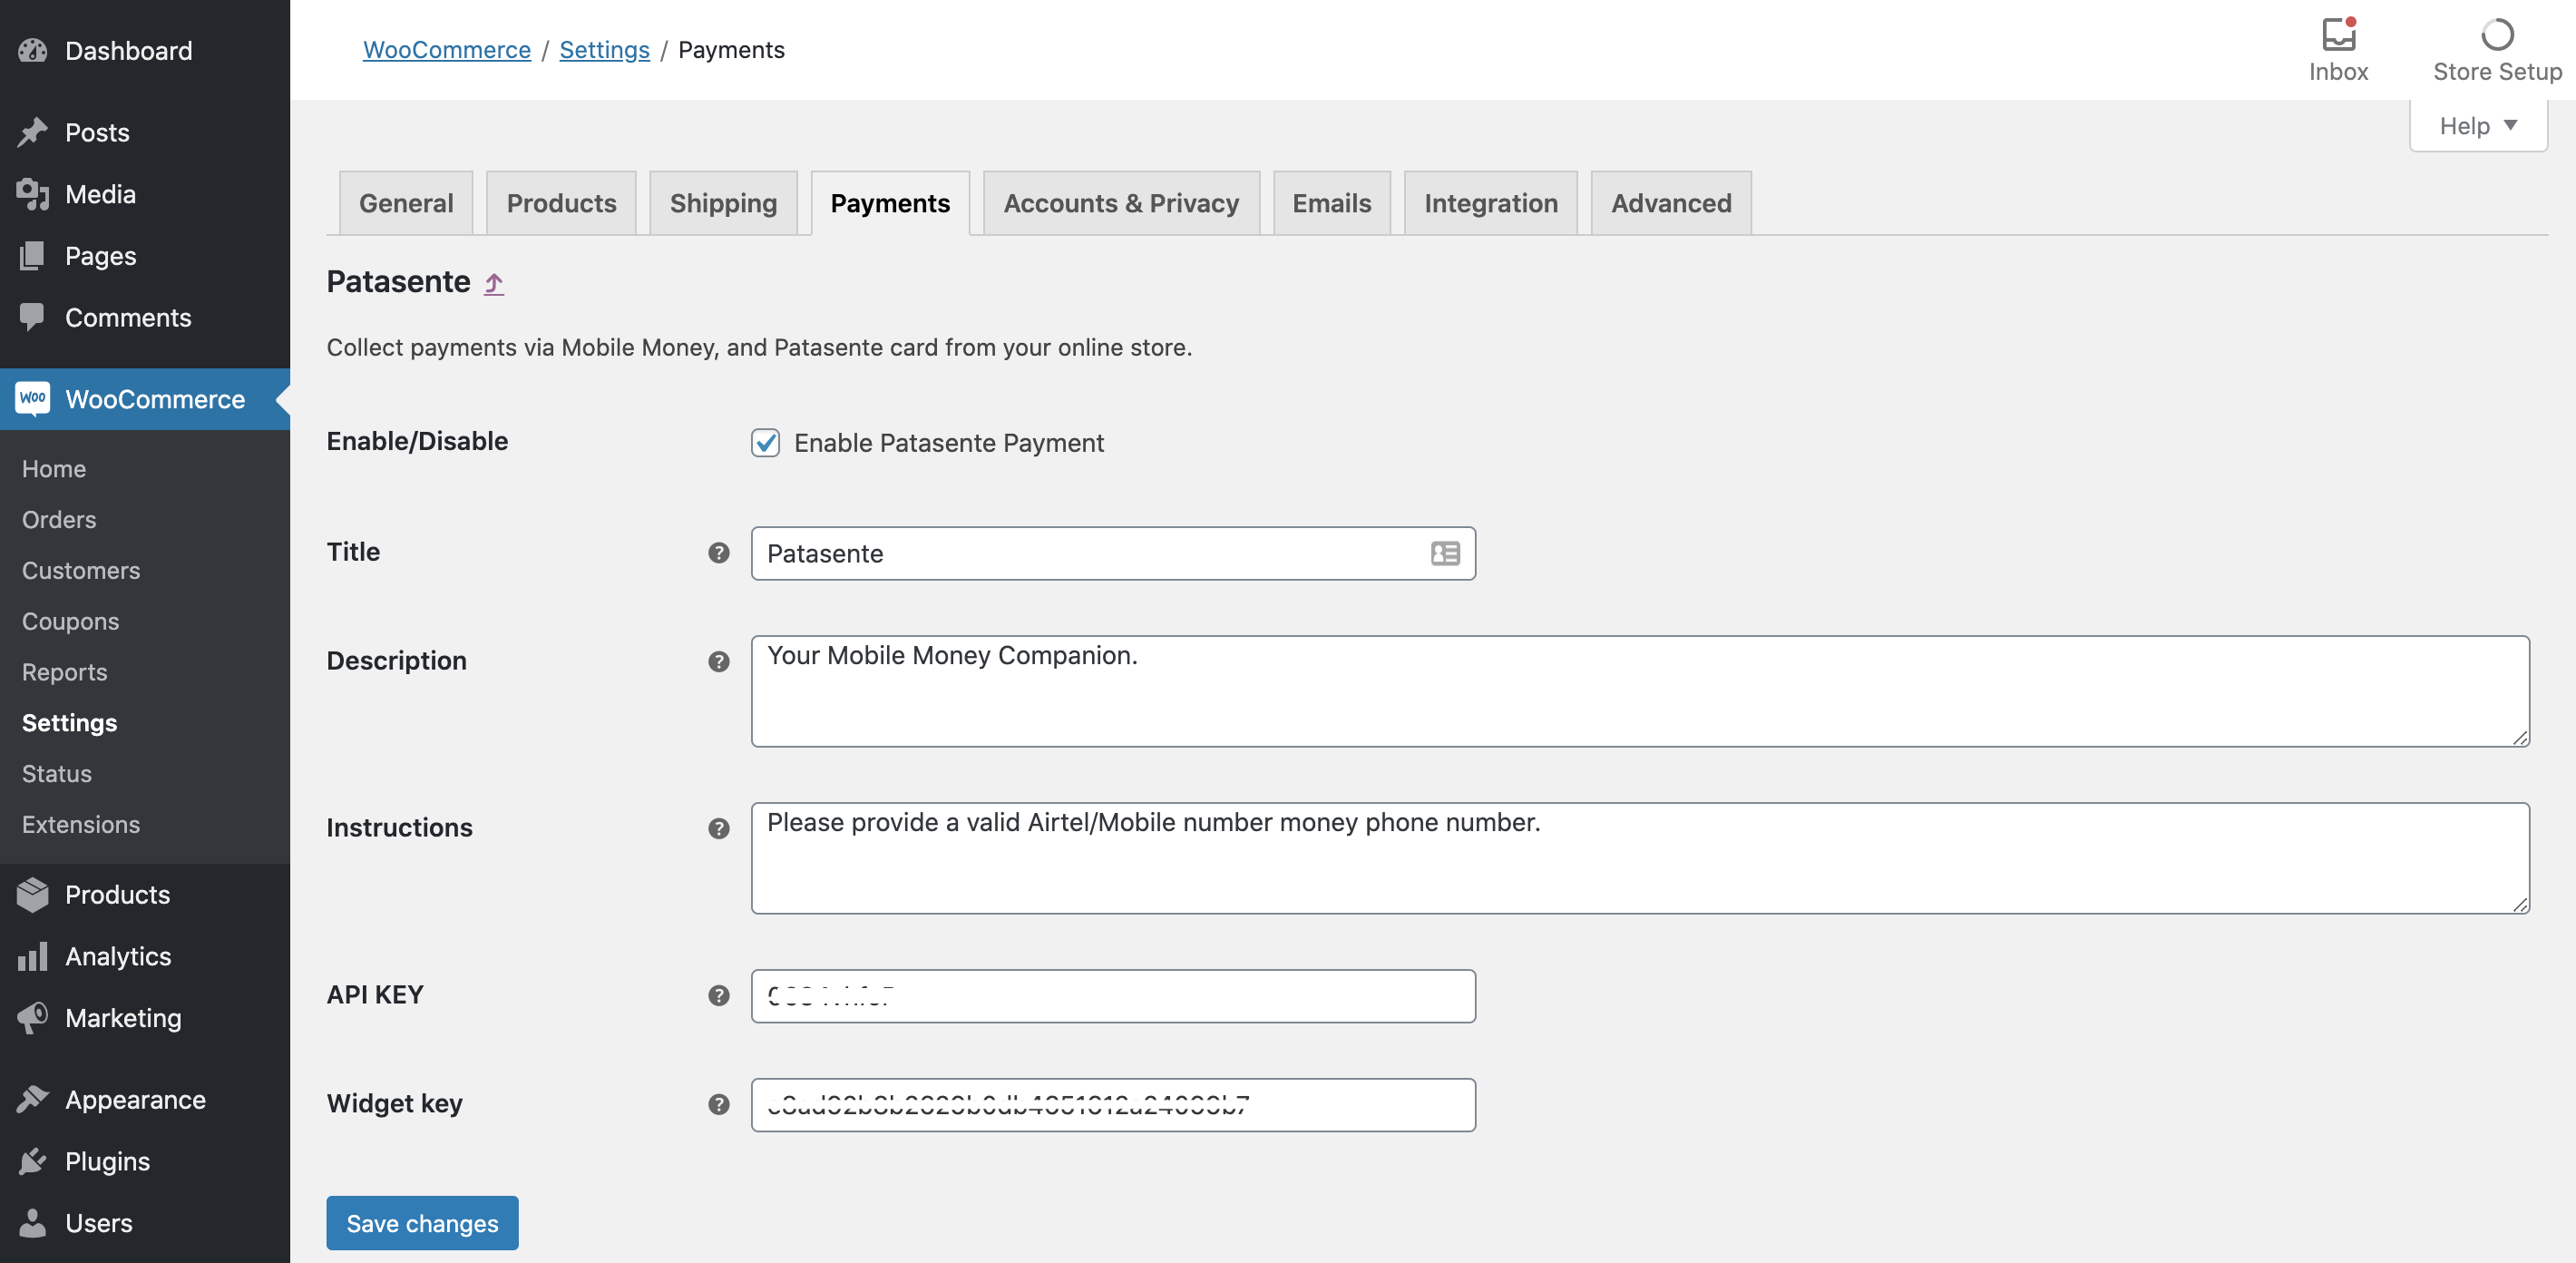
- Complete the form
- Provide the Title
- Description
- Instructions
- Gateway API key
- Gateway Widget Key
- Save changes
 Fig 3: WooCommerce Patasente Payment Gateway settings
How to pay with WooCommerce Patasente Payment Gateway
Assuming you’ve successfully followed the above steps, the Patasente Payment optional will be available for selection on your website.
And Customers will be able to checkout and make payments using Patasente.
User will click Proceed to checkout on the cart page.
 Fig 4: Cart page
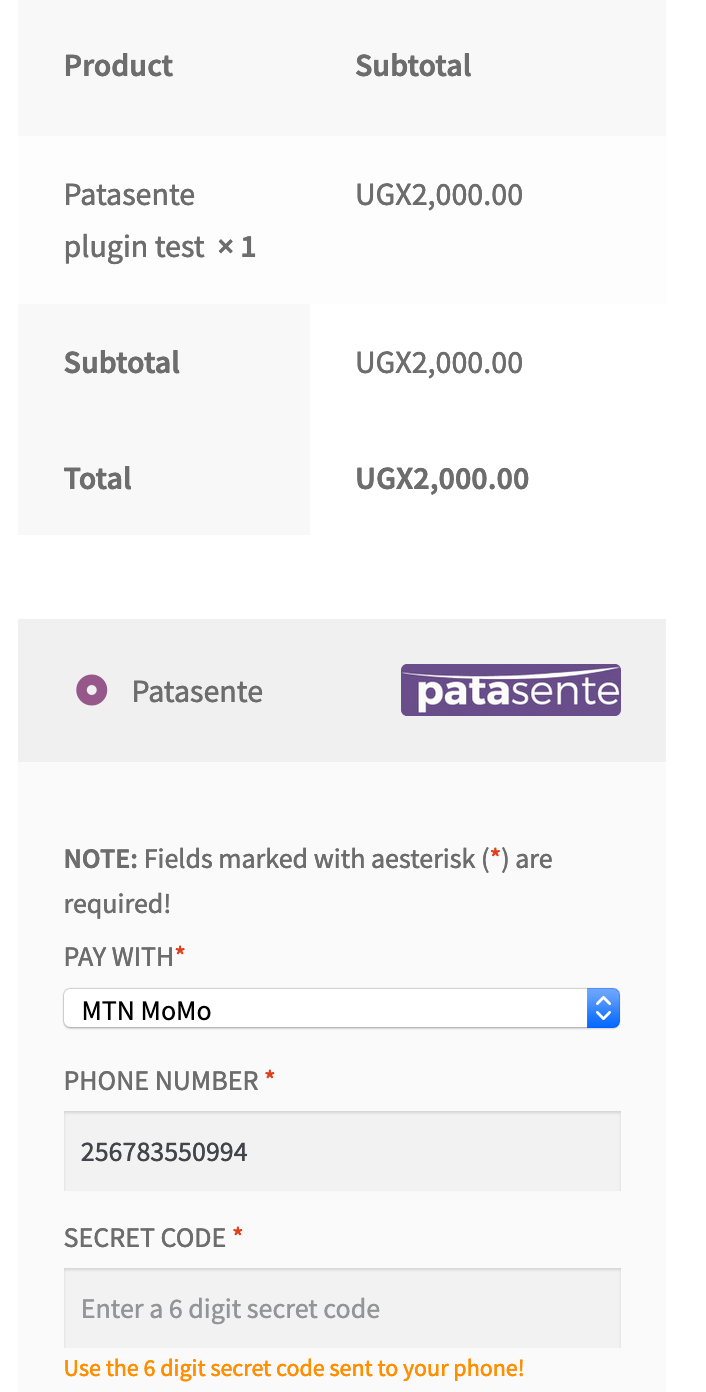
User chooses what to use for payment.

Fig 5: Patasente is avaialable payment method
How to access the payments
The total amount collected via Patasente Widgets, is processed by Patasente and credited or deposited to your Patasente Wallet. Make sure to put the right, correct or accurate Gateway API and Gateway Widget Keys in the WooCommerce Patasente Payment Gateway settings.
How to access the money?
The amount is deposited to your Patasente Wallet that corresponds with the Collect Widget Keys in less than 3 minutes. As customers pay, we shall send you free sms texts and email notifications to keep you update with the sales activities on your online store.
Login to your Patasente Wallet either via our Mobile App or on the web (https://patasente.me). You can make internal transfers, pay for factored invoices, pay suppliers, withdraw and transfer the funds to your mobile or bank account.
You can also make payments for a variety of products, bills and services such as Airtime, Internet Data bundles, UMEME, Water bills, and URA taxes among others.